Imagine this: You live in a (dystopian) world without online forms. Gasp! Now, do you need to get RSVPs for community events organized by your startup? Start e-mailing all your invitees individually to seek their details. Of course, no one you know responds immediately to any email! So be ready to follow up!
And once your guests have sent in their replies, get your interns to collate all the responses in one place so you can plan your event accordingly. But your intern was preoccupied with a bunch of other tasks while also putting together a database. So, mistakes have crept in, and now you have nowhere to go to seek the correct details!
Exasperated? Well, we apologize, because we don't live in this world. In fact, whether you want to collect customer feedback, get RSVPs for meetings and networking mixers, or run a straw poll for the team lunch, online forms have actually got you covered. By simply drafting and sharing a form, you can capture a varied array of details easily and analyze them on compelling dashboards, and sheets. Sketchnote takes these functionalities several steps ahead by allowing you to easily convert your form responses into tasks on a Kanban board, and much more! Read along to understand why you need Sketchnote forms for your business and how to get started!

What are Sketchnote forms and how to create one?
Sketchnote form is one of the twelve handy views on Sketchnote. Simply pull up this view to draft a survey with up to nine response options like short and long answers, sliding scales, ratings, and more. Fascinating, right? Well, there is more! Once you are done, simply share the form link with your respondents for them to fill out the form.
Drafting a form on Sketchnote is a breeze. All you need are these few instructions provided below and you are on your way to becoming a forms expert. Let’s get started!
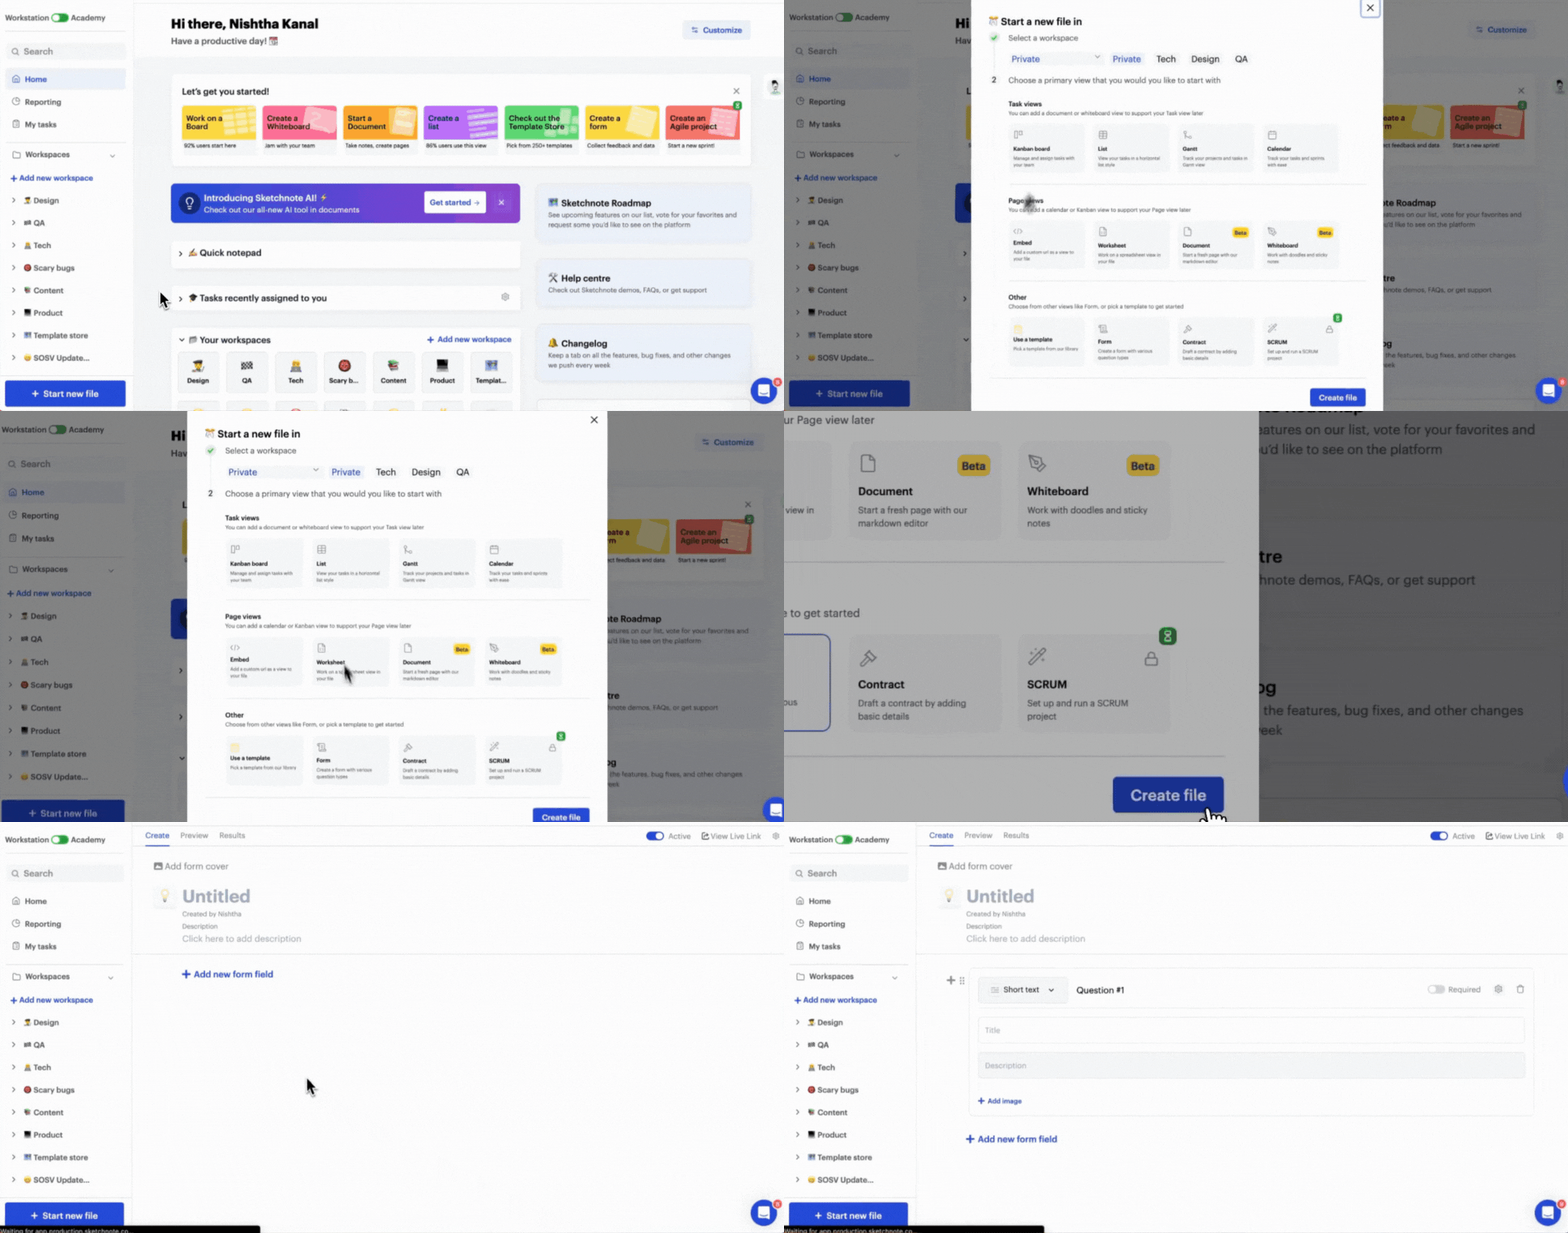
Create a form file by hitting “Start new file” and choosing “Form”. Then, select a workspace to save it in. Choose Private to save your form in the Private section, and done! Once you are inside your form, add a title and a brief description to it in the provided fields.
And now, it’s time to add your burning questions! Here’s how:
Click on “Add new form field” to choose a question for your form. Type out your question and add a description, if needed! Pick the field type based on the kind of answers you are looking for from your responders. The question-type options you can pick from include Short text, Paragraph, Linear scale, Star rating, Radio box, Checkbox, Dropdown, Phone number, Email, Date picker, and Attachment.
You can even add placeholder text to your questions to sample the ideal response from your audience. For scale and rating questions, label what each point of the answer can signify. To indicate that a question on the form is mandatory, switch the “Required” toggle on the top-left of the question card for mandatory questions in your form.
And once you are done adding your questions, hit the “Preview” tab on the top-left of your form to see exactly how your form will appear to the responders. Tweak it if you need to, by hopping back onto the “Create” tab.
Once the perfect form is ready, click on the “View live link” to see your active form. Share the URL with your audience to populate their responses.

That's awesome! But what makes Sketchnote forms so special?
While there are loads of reasons why Sketchnote forms are truly incredible, we've listed five for you to get a brief overview of its functionalities. Here they are.
Results dashboard on your form
Once you've shared your form with the world, and the responses start pouring in, it can get quite overwhelming. But a dashboard designed to present this data lucidly helps you manage all received information systematically. On Sketchnote, all your form responses show up on the results tab in your form. And this tab is broken up into three sub-tabs further. Let's see how each of these can help you as you analyze your form responses for the best results:
Inbox view
The first view on the Results tab records individual form responses, chronologically. This means that answers to all the form questions from one responder will be presented in one place. Of course, you can click on the list of responses to view all the replies independently. Individual responses allow you to draw up user personas of your audience.
Summary view
This view populates all the form responses to a question, together. For example, all names will be clubbed together, all addresses in one place, ages together, and so on. Additionally, rating-type responses are presented as bar diagrams to aid decision-making. Summary gives you an overview of each question on your form.
Sheet view
Are you a champion of the handy spreadsheet? Then this view is for you! All your form responses are logged in a Sketchnote worksheet. Download this sheet locally by hitting the "Download all responses" on the top-right of your sheet. Now, you can maintain a local backup of your data, and even update your master database locally from this spreadsheet.
Validate your form responses, easily
Worries your form results attracting bot or spam submissions? There's a really simple fix for this on Sketchnote. Add a CAPTCHA to your forms to defray invalid submissions. And it's quite simple. Let's go through how to do this, step-by-step.
- Click on File options on the top-right of your form file.
- Then, choose Form settings on the drop-down menu Toggle the CAPTCHA option under Form settings to add a safety net to your form.
Here's how this will present on your form—prior to submission, your responders will be prompted to check the CAPTCHA and answer a simple quiz to validate the response. It's quite cool!

Auto-submit timer on your forms
Want to conduct tests or interviews via Sketchnote forms? The amazing tech team at Sketchnote has optimized for this specific use case, with the auto-submit feature on forms. This means, you can set a timer to your form, which will auto-submit whatever sections the responder has filled in that time. So, if your candidate has filled in only three answers in 30 minutes, only those answers will be recorded. want to enable an auto-timer for your forms? Find the option to set a timer using the gear icon on the top right of your forms screen, to set the timer.
Templatize your forms easily
Every company has forms they use regularly. Whether it's an employee leave application, feedback from customers, raising a complaint, or anything in this vicinity. Instead of drafting a new form from scratch every time you need to use it, you can turn it into a template!
This way, you can pull it up and reuse the template with slight modifications to suit the current usage. It's quick and efficient. Even better, this template is available to all your organization's members, so you can delegate the job of starting a new form to your teammates too.
And it's quite easy to templatize your form. Once you're done designing one, click on file options on the top right of the screen and choose "Save as template". Add some details about your template, give it a spiffy cover image, and boom! You have a template! Save time by not having to draft a form from scratch, and retaining all the crucial details that need to be in the form.
Track your form responses on a Kanban board
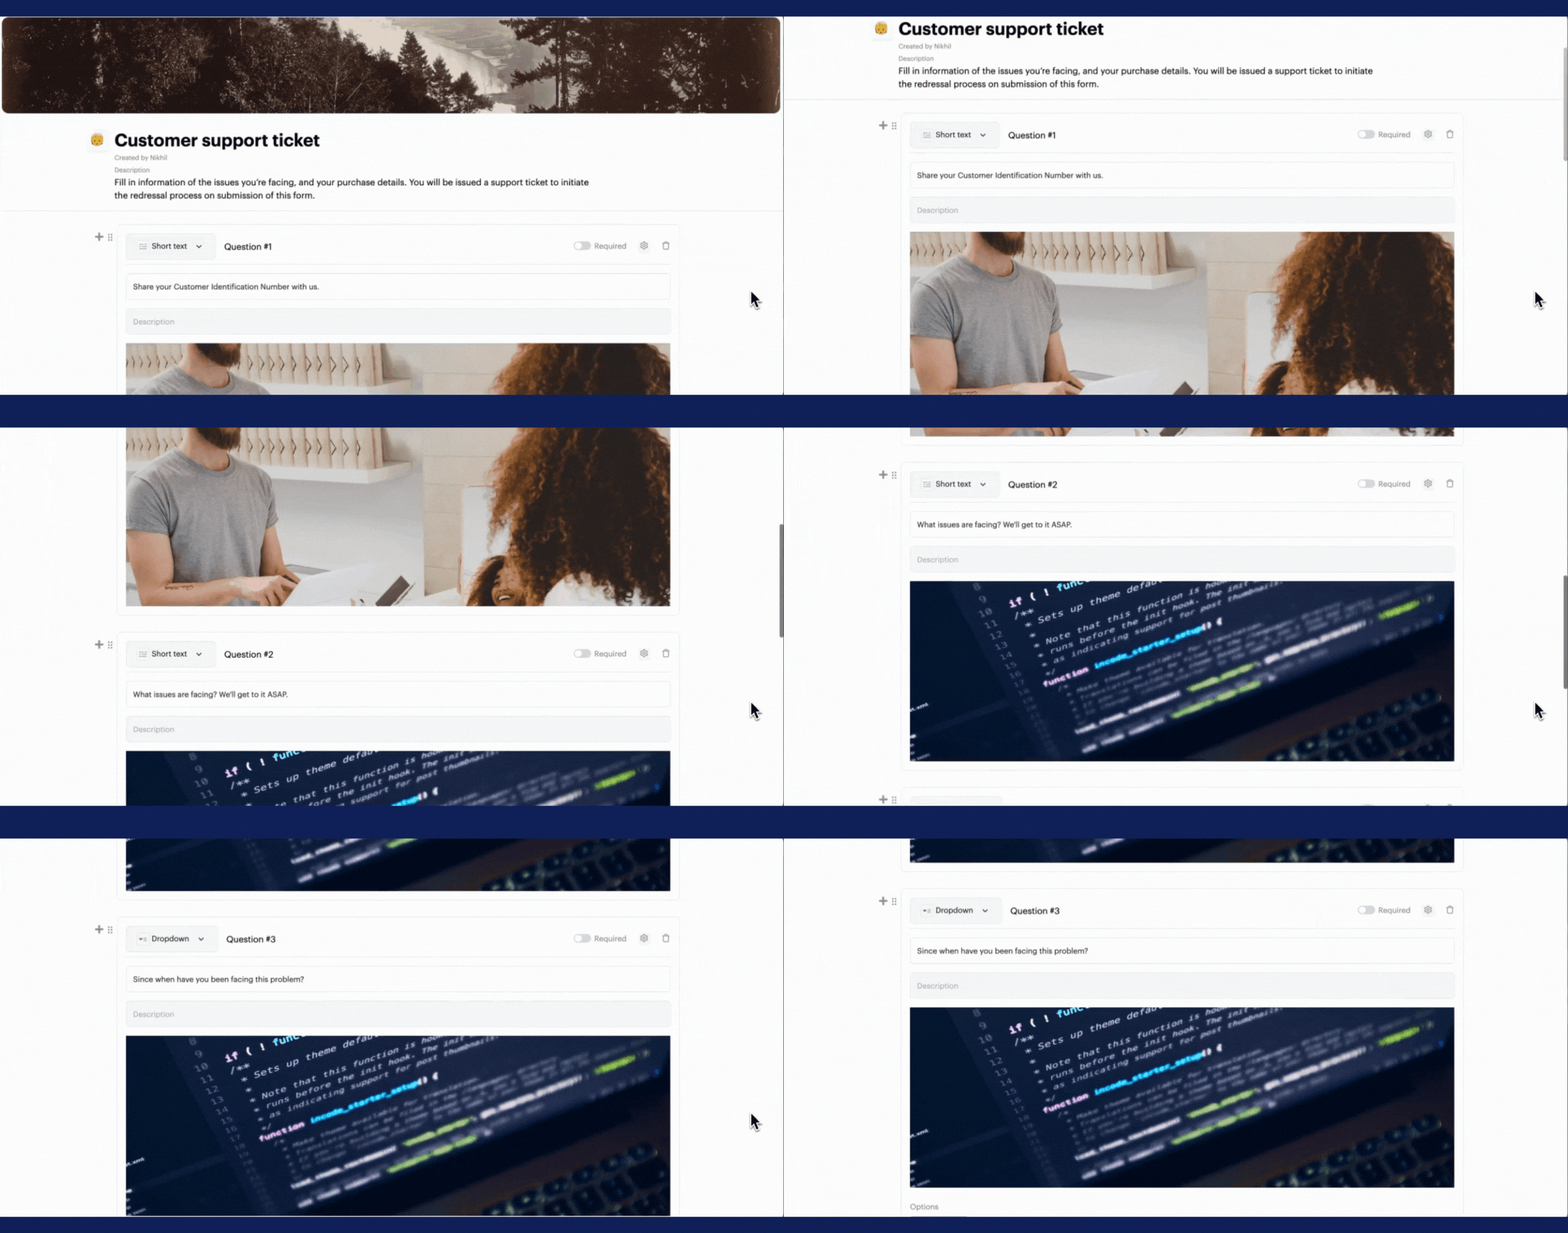
Now, imagine this. Responses to troubleshooting requests from your users are pouring in. And you're tasked with adding these open issues to your Customer support ticket Kanban board. Tedious, right? Obviously, you're also worried about missing out on a submission by mistake.
But, there’s an uncomplicated way to convert your form responses to tasks on a board. Head to the Settings option on the top right, and select Form settings. Then hit Save results as tasks. Now, create a new file in a workspace and select the question you want the tasks to be named after. So for example, if it's a feedback form, you can have the names of the responders as task titles. Easy, right? Now every time you have a customer fill out a troubleshooting request form, it can be found as a task in this file. All you need to do is assign it to a colleague and done!
Eliminate all the monotony of manually adding tasks to the board with this form-to-task Sketchnote feature.
Handy tips to keep in mind while drafting a form
Congratulations! You are now all set to begin drafting and sharing forms on Sketchnote. But before you get started, here are a few pointers to create flawless forms. Here it is:
- Add a simple description to your form. Be sure to include the reason why this form has been sent to the responder, in order to provide context to your audience.
- Double-check your form before sharing it with anyone. Getting an extra set of eyes on your form before making it public allows you to ensure that important questions—like the responders’ details—are not missed out on.
- Utilize different question field options provided in the form builder. On Sketchnote, you can choose from nine different question types, including sliding scales, ratings, multiple choices, dropdowns, and more.
- Save time and effort while drafting your form by pulling up a form template from Sketchnote’s template store, instead of from scratch. The template store on Sketchnote is home to over 50+ business form templates to choose from. You are certain to find one to suit your needs here. And you can simply pick one and make modifications when necessary!
Go ahead and create amazing forms on Sketchnote now! Good luck!
New to Sketchnote? Here’s why you need to build your startup with us
Sketchnote is an all-in-one startup OS for learning, team collaboration, doc management, and legal help. It’s a platform created for entrepreneurs, by entrepreneurs. With Sketchnote, you can bring your team on one page and work on top-of-the-line features such as:
- Workspaces that double up as a hub for your teams and projects
- Kanban and Whiteboards Boards that bring your tasks and teams together
- A fully-loaded markdown editor to create any document—from pitch decks to team wikis.
- Fill-and-go legal documents like NDAs, MOUs, ESOPs, and more
- Handcrafted and curated startup lessons to take a deep dive into every aspect of startup building and scaling.


