Integrating Meta Ads Manager with Sketchnote revolutionizes how you manage and optimize your ad campaigns. This guide walks you through the integration process, enabling you to centralize campaign data, create custom dashboards, and make smarter marketing decisions—all within the Sketchnote platform.
Why Integrate Meta Ads Manager with Sketchnote?
Marketers know the value of streamlined workflows. By integrating Meta Ads Manager with Sketchnote, you can consolidate your campaign data into a single, intuitive dashboard. This integration helps you:
- Analyze performance metrics with ease
- Manage multiple ad accounts efficiently
- Adjust budgets strategically
The result? Enhanced marketing efficiency and improved ROI.
Getting Started with Meta Integration
Connecting Sketchnote to Meta Ads Manager is simple but requires a few steps to comply with Meta’s data privacy and security standards. These measures ensure compliance with regulations like GDPR while safeguarding sensitive information like campaign performance and spending. Let’s walk through the process step by step.
Step 1: Invite Teammates to Your Meta Business Portfolio
To begin, ensure your team members have access to your Meta Business Portfolio.
For Admins/Owners:
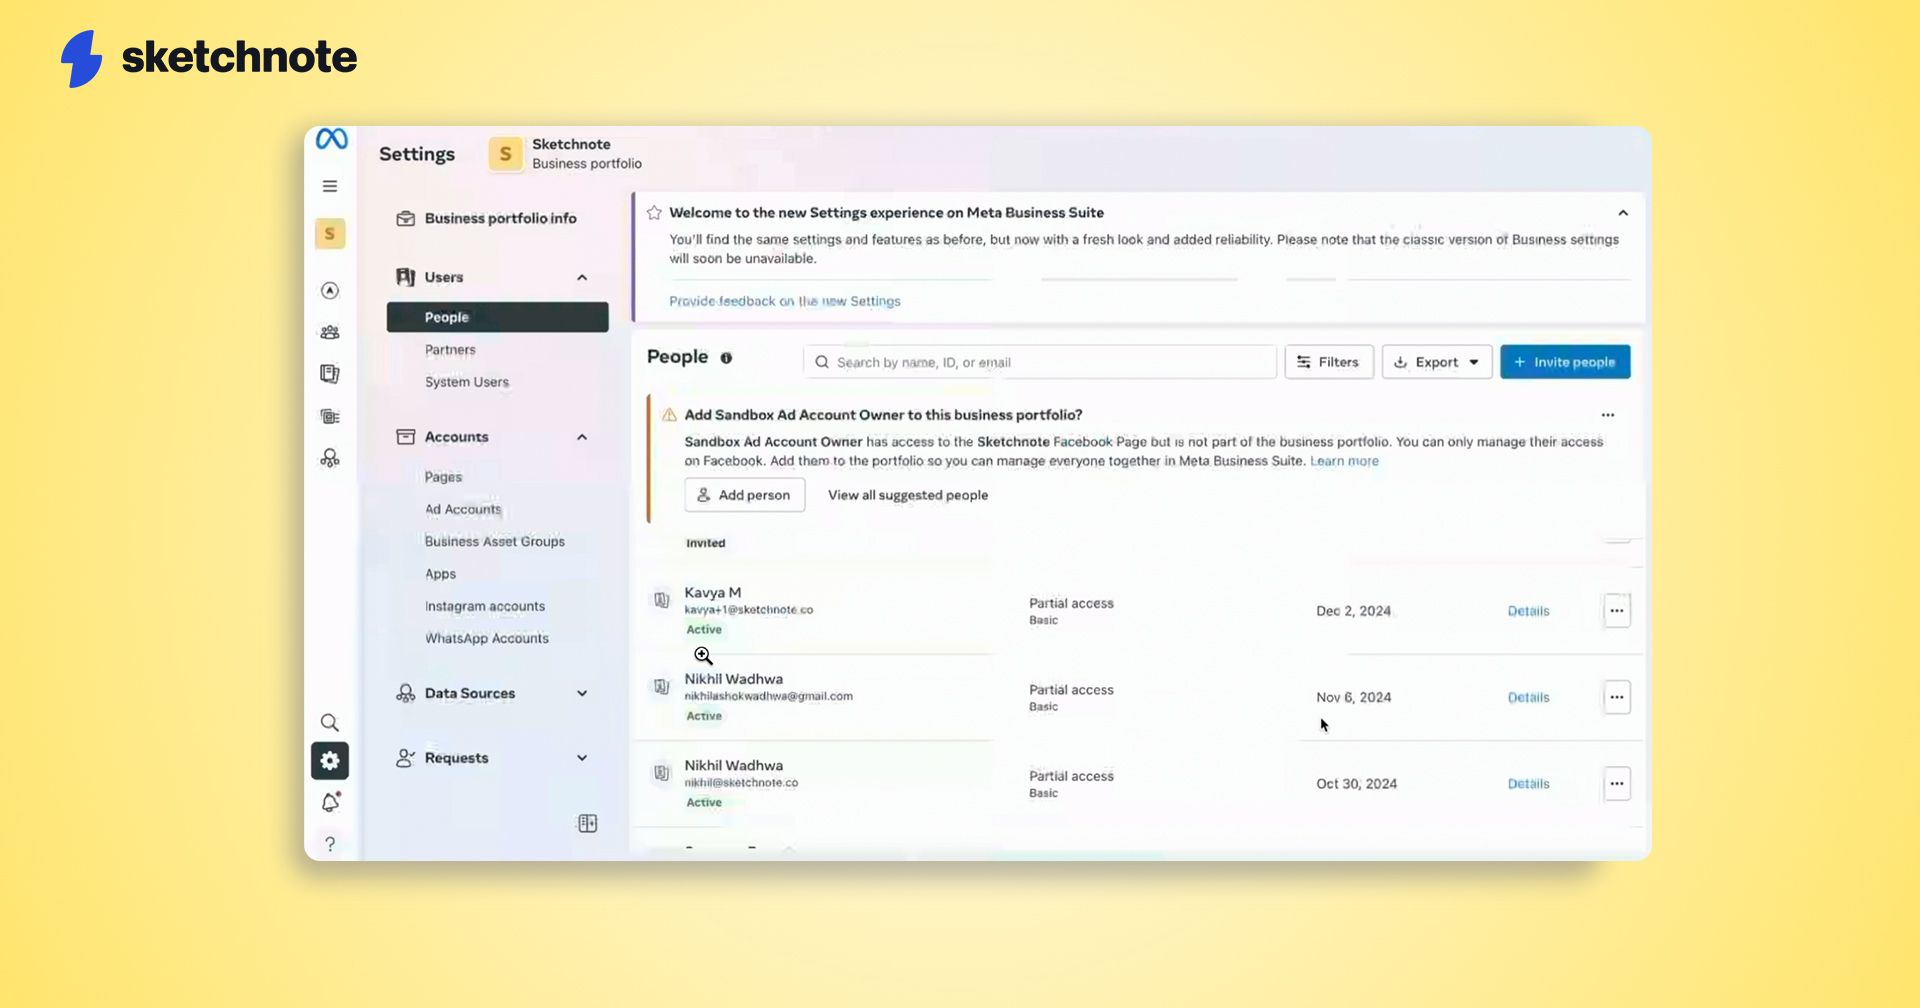
- Log in to Business.facebook.com and go to Business Settings.
- Under Users, click People.
- Select + Invite People, enter your teammate’s email, and follow the prompts to set permissions.
- Click Send Invitation to finalize.
For Invitees:
- Log out of Facebook and open a new browser profile.
- Use the invitation link from your email to accept the request.
- Confirm your business portfolio details and complete the security prompts.

Step 2: Register as a Meta Developer
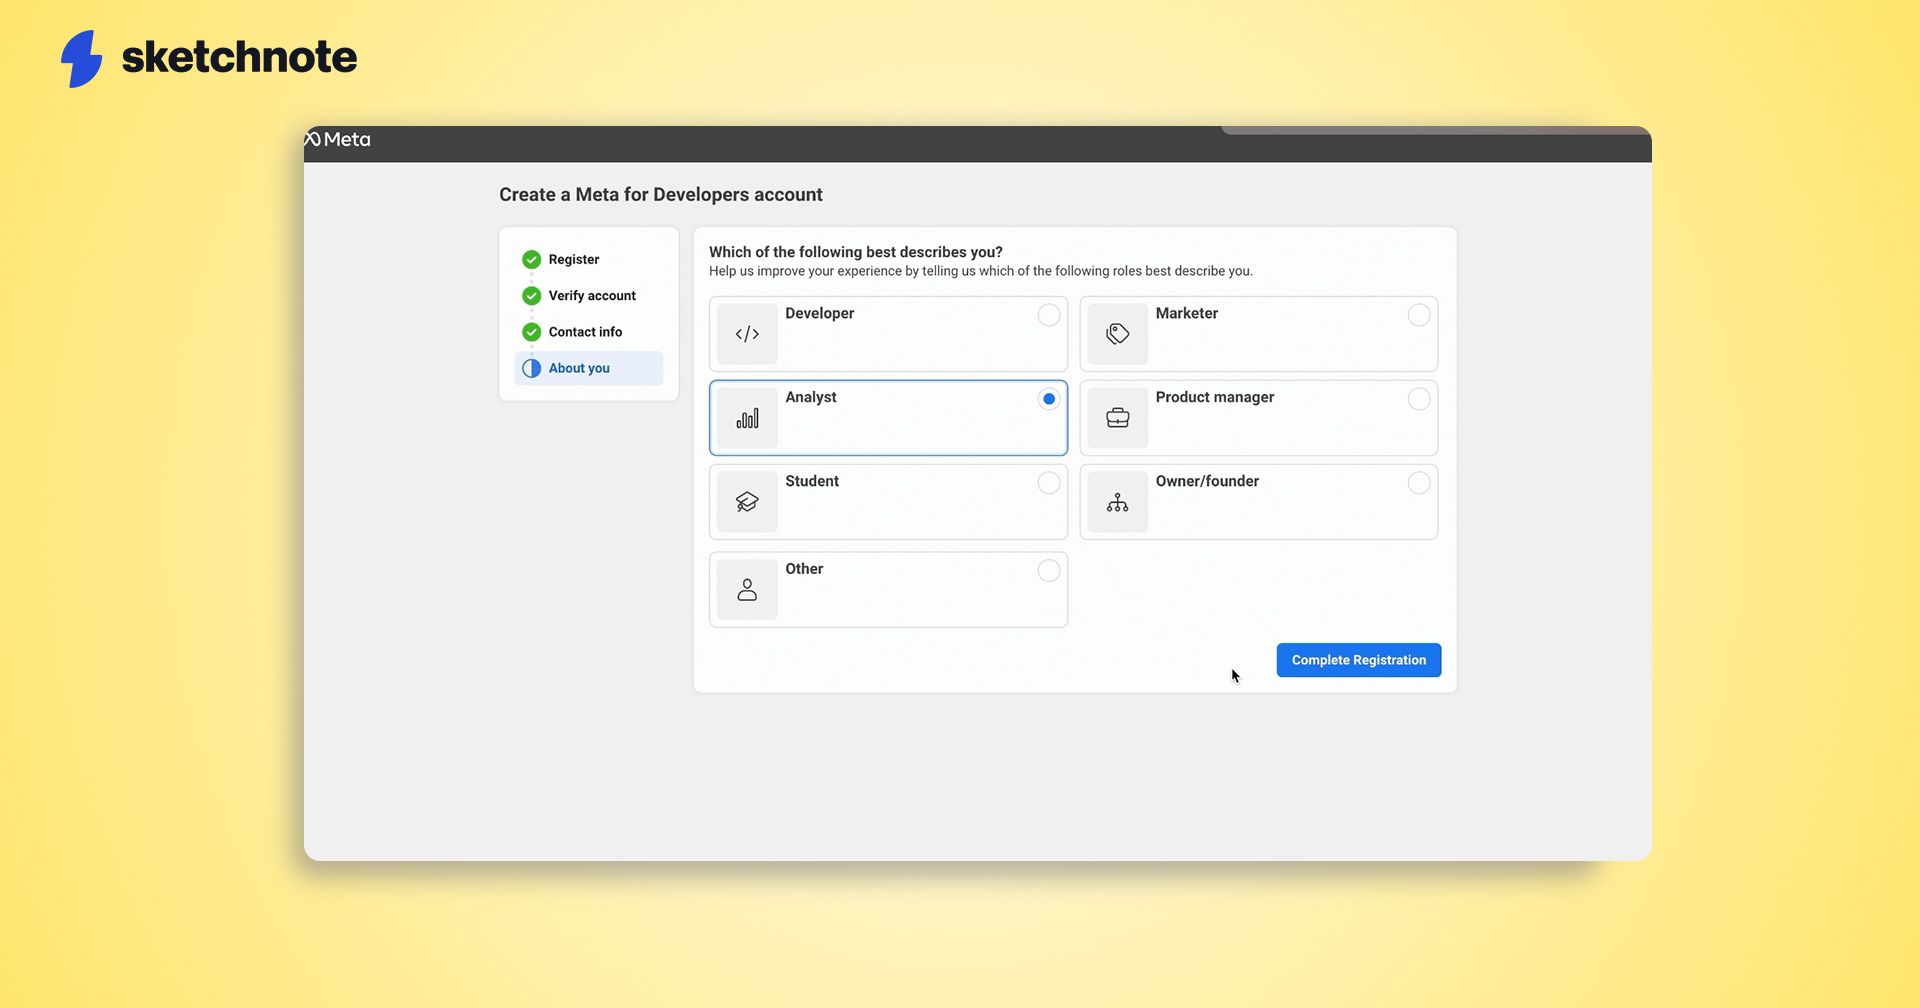
To assign app permissions, the invitee must register as a Meta developer.
- In Business Settings, navigate to Apps.
- Click Learn more under Developer account needed and follow the registration link.
- Verify your contact details, register as an Analyst, and complete the registration process.

Step 3: Assign Apps and Permissions
Configuring permissions ensures seamless data sharing between Meta Ads Manager and Sketchnote.
For Admins/Owners:
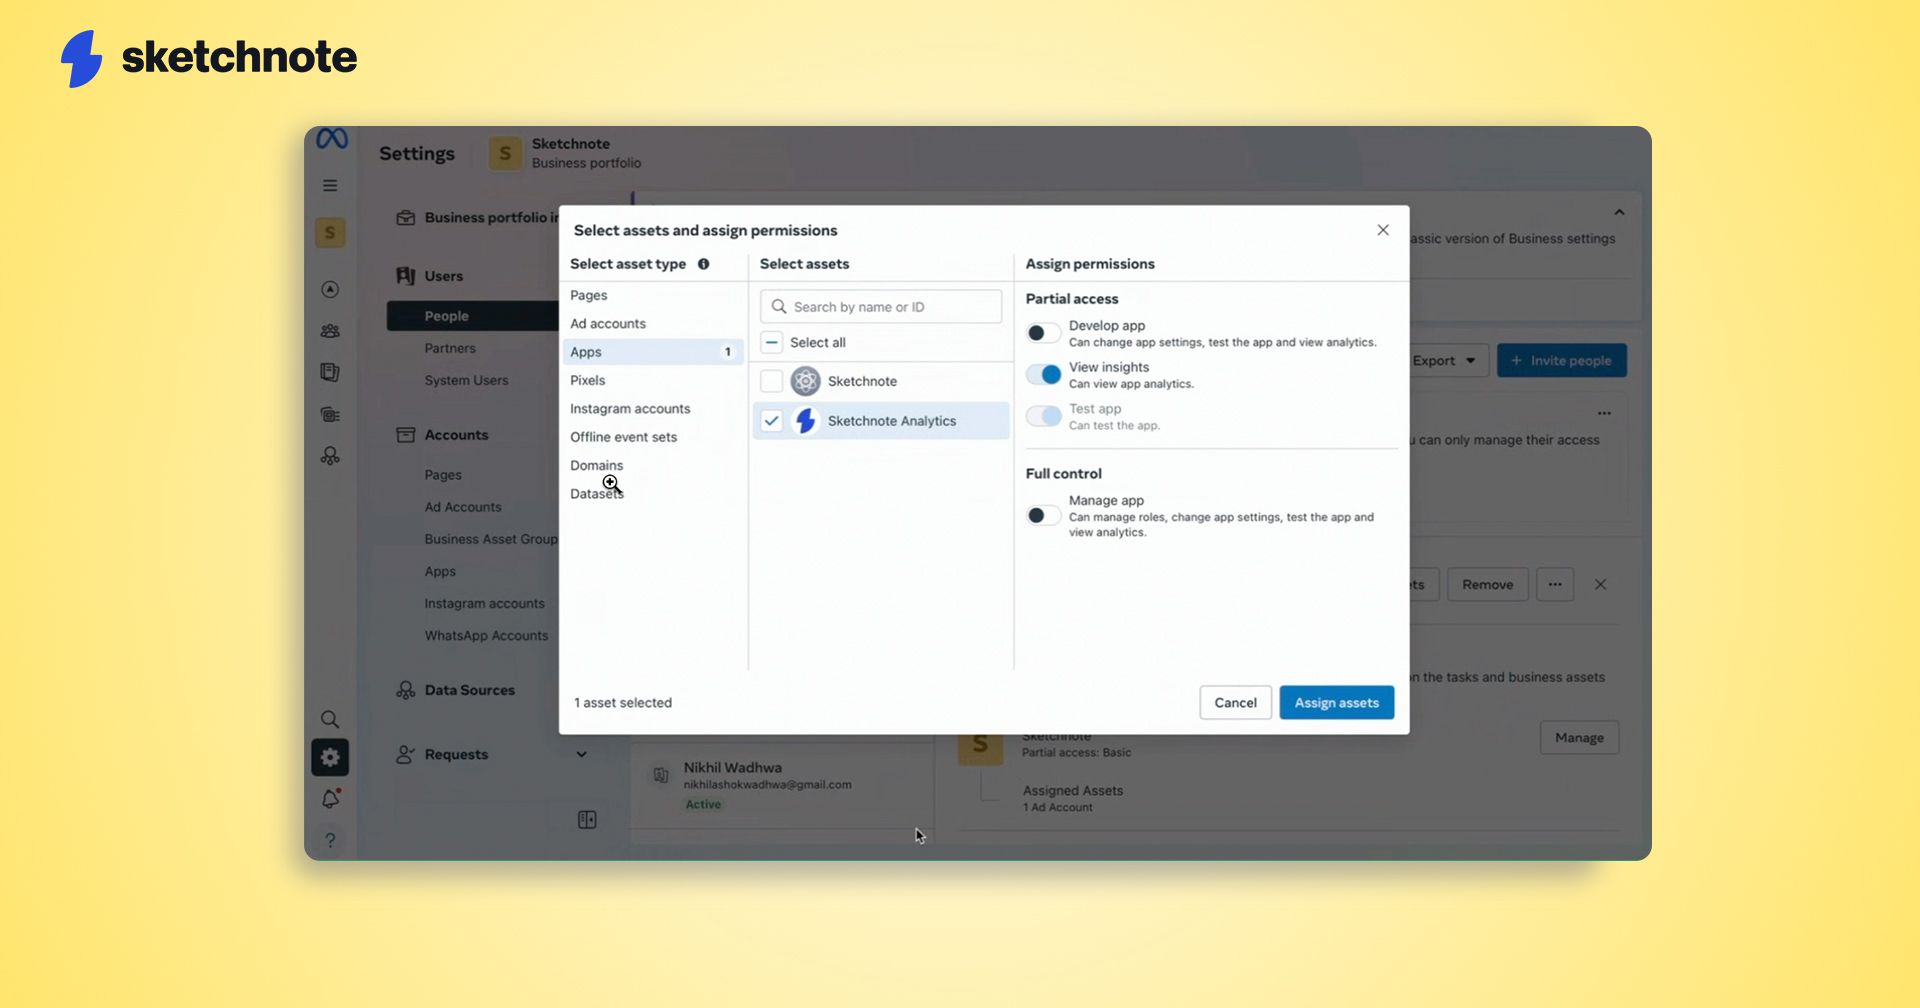
- Click the Options button next to your invitee’s name.
- Select Assign assets from the dropdown menu.
- On the left panel, choose Ad accounts, and on the right, toggle View performance to grant access.
- Now, navigate to Apps.
- Select the relevant app and assign View Insights permission.
- Use the Assign Assets option to complete app configuration.
For Invitees:
- Log in to Sketchnote using the browser profile where the invitation was accepted.
- Navigate to Analytics Hub in Sketchnote.
- Click + Add client, enter the client’s details, and connect the desired Meta ad accounts.

Step 4: Design Dashboards in Sketchnote
With the integration complete, it’s time to set up your dashboards:
- Add widgets to track KPIs like impressions, CTR, and reach.
- Customize dashboards to visualize metrics in ways that suit your team’s needs.
- Apply filters to analyze trends over specific periods and make data-driven decisions.
Here's a quick walkthrough of all the steps for you to get started!
Sketchnote’s Analytics Hub
Sketchnote’s Analytics Hub is designed to simplify ad management with features like:
- Multi-account support: Manage multiple Meta ad accounts seamlessly from one interface.
- Custom dashboards: Tailor your dashboard to reflect the metrics that matter most to your campaigns.
- Time-period filters: Dive deep into performance trends over custom date ranges.
These features provide a comprehensive view of your campaigns, enabling you to make informed decisions and drive better results.
Integrating Meta Ads Manager with Sketchnote gives you the power to centralize campaign data, streamline workflows, and optimize ad performance. With its user-friendly tools and insights, Sketchnote helps you save time, reduce complexity, and maximize your marketing impact.
Ready to take your ad strategy to the next level? Start tracking your Meta ad campaigns on Sketchnote today and unlock your marketing potential!


